Official Luthiers Forum! http://www-.luthiersforum.com/forum/ |
|
First outside mold http://www-.luthiersforum.com/forum/viewtopic.php?f=10102&t=8679 |
Page 1 of 1 |
Author: | nathan c [ Mon Oct 02, 2006 12:09 pm ] |
Post subject: | |
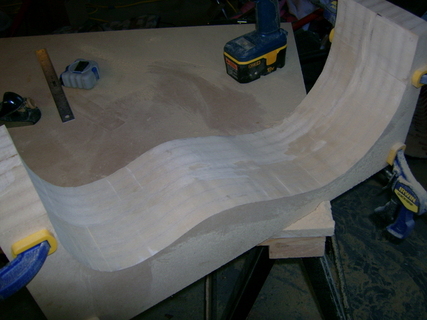
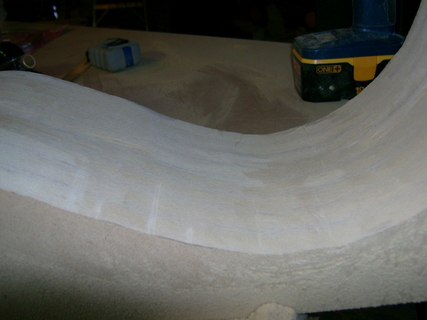
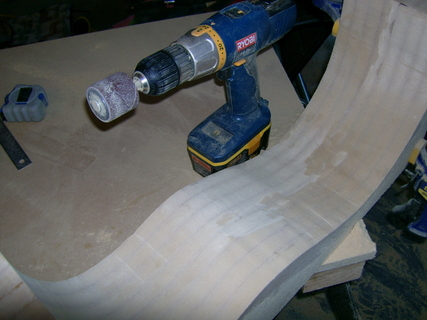
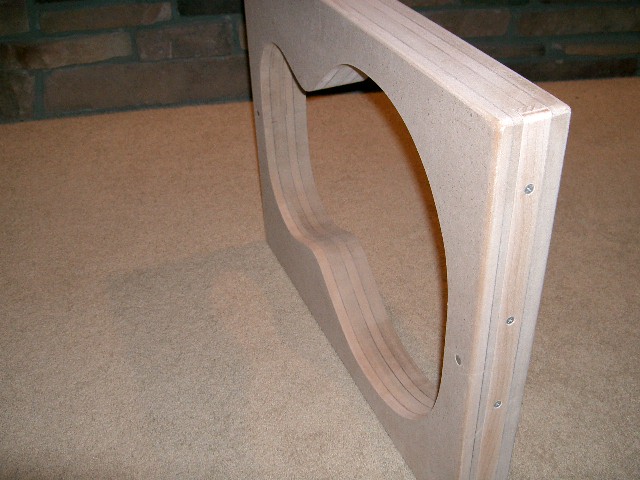
I've had a heck of a time creating my outside mold. Bandsaw troubles mainly. But anyway. I've done what I can with what I have. That leads me to the question "Is it enough?" Obviously, I'm no expert in luthiery. It looks like the mold is too rough. I've done my best to sand it, but I don't have a spindle sander as you see in the pics. How smooth and even does the mold need to be? Will the side contain dents and stuff if the mold does? It's really wavy to the touch. Yeah, I know it's a noob question :) pics follow |
Author: | Serge Poirier [ Mon Oct 02, 2006 12:19 pm ] |
Post subject: | |
Nathan, i would suggest you buy a sleeve with sand paper that will fit a drill press, you really want it smooth and even in there. |
Author: | Serge Poirier [ Mon Oct 02, 2006 12:25 pm ] |
Post subject: | |
Nathan, how close are you to the drawn line? |
Author: | Brad Way [ Mon Oct 02, 2006 12:34 pm ] |
Post subject: | |
I am sure others can tell you how important it is for the mold to be smooth but it is essential that the sides of the mold are perpendicular to the face of the mold (square). One way that I accomplished this was to make a template first. I used a piece of 1/2 MDF. I cut out the template with a jig saw. Once the template was cut out I filed the edge to get it smooth. This is much easier to do on the template because it is only 1/2" thick. Once I had a template I used a few peices of double sided carpet tape to tape the template to the precut molds (like you have in your picture). With the template mounted to the rough cut molds you can use a template type router bit to transfer the pattern from the template to the mold. This process will ensure the molds sides are perpendicular and smooth without sanding. If you make a template a little oversized you should be able to clean up your current mold fairly easily. Good luck! ![]() |
Author: | Shawn [ Mon Oct 02, 2006 12:41 pm ] |
Post subject: | |
What I do is saw the first layer close to finished shape and then sand till it is exactly to profile. I then the layers together and drill alignment holes through the layers and draw the outline that needs to be cut on the other layers. I then disassemble the stack bandsaw each of the other layers to close to the line scribed from the first one that is correct. I then pin the reference profile piece to the second and use a router with a flash trim bit to cut the second layer to exactly the first and repeat that operation for as many layers as needed. At that point, because all the layers have alignment holes and have been flush trimmed to the first, the stack will be very even and close to final shape without having to deal with much sanding. The stack can be glued and assembled and it only takes a little bit of hand sanding with a block to finish it. While this is more steps than what you did, the end result is less dependent on even sanding and works very nicely. |
Author: | Brad Way [ Mon Oct 02, 2006 12:47 pm ] |
Post subject: | |
Shawn's process is similar to mine except he uses his first layer as the template. Pretty good idea. |
Author: | nathan c [ Mon Oct 02, 2006 12:48 pm ] |
Post subject: | |
Serge - I don't own a drill press. ![]() I'm pretty much right on the line (after sanding) Hesh - Thanks. I'm doing what I can with what I got ![]() Brad - Hmm, I do have router. So let me get this right. There's two "halves" then each half has a side. So I would use the template and router on half 1 side 1 and then half 1 side 2. Then repeat the process? |
Author: | nathan c [ Mon Oct 02, 2006 12:50 pm ] |
Post subject: | |
[QUOTE=Shawn] What I do is saw the first layer close to finished shape and then sand till it is exactly to profile. I then the layers together and drill alignment holes through the layers and draw the outline that needs to be cut on the other layers. I then disassemble the stack bandsaw each of the other layers to close to the line scribed from the first one that is correct. I then pin the reference profile piece to the second and use a router with a flash trim bit to cut the second layer to exactly the first and repeat that operation for as many layers as needed. At that point, because all the layers have alignment holes and have been flush trimmed to the first, the stack will be very even and close to final shape without having to deal with much sanding. The stack can be glued and assembled and it only takes a little bit of hand sanding with a block to finish it. While this is more steps than what you did, the end result is less dependent on even sanding and works very nicely.[/QUOTE] ha! you only think it's extra work ![]() |
Author: | Brad Way [ Mon Oct 02, 2006 2:03 pm ] |
Post subject: | |
[Quote=nathan c]So I would use the template and router on half 1 side 1 and then half 1 side 2. Then repeat the process?[/QUOTE] I guess I should have explained things a little better. ![]() The process works well if you have a 1 template router bit with the bearing on top and 1 template router bit with the bearing on the bottom. This is the process I use: 1) Mount template to top of mold 2) Use top bearing router bit to route along template from top side. This will probably allow you to plunge about 3/4 - 1" deep. 3) I them flip the mold over and use the bottom bearing router bit to route from the other side. I use a 2" long bit that bearing will reach the area that was routed in step 2. In any case I am sure you will give it figured out! That what is great about the OLF...lots great ways to solve a problem. |
Author: | Rod True [ Mon Oct 02, 2006 2:11 pm ] |
Post subject: | |
Nathan, one other thing if I may... How thick are you making the mold? In the picture, it sure looks thick, unless of course that is both halfs of the mold clamped together. Than it looks like it should be fine. I sure like the router method when making molds, it's much much more accurate than the way your doing it. On the first mold I attempted to make was so out of square. It sure made good fire wood though ![]() Take the advise already writen here and maybe start over (sorry to say it) and make one perfect piece, and use the dowel method mentioned by Shawn, you will have a nice mold when it's all done. Or you could just purchase a nice mold and bending form from John Hall at Blues Creek guitars (he's a sponser with realy good stuff). But, sometimes finances can't support such a purchase and you have to resort to making your own. What ever you choose, you've come to the right place for questions and all around great fun. ![]() |
Author: | MSpencer [ Mon Oct 02, 2006 2:15 pm ] |
Post subject: | |
Nathan, I share your frustration, my first attempts at doing a mold were not a good thing. I do know that it is very important for the mold to be done properly to get the results you want. I found this out when I went ahead and ordered one from John at Blues Creek. His molds are excellent and very well constructed and right on in every way. I had previously worked with a spool clamp board and what a difference. John's molds and bending patterns are very reasonable. I found them actually to be dirt cheap when I considered how much time I spent on the few slopy ones I had done myself. This is a very important tool for a number of alignment reasons so it needs to be clean and exact. Good luck on whatever direction you go Mike |
Author: | nathan c [ Mon Oct 02, 2006 2:19 pm ] |
Post subject: | |
Brad - I understand now :) Rod - Yes that's both halves clamped together. I've decided to trash this mold and start a new one. I could buy a mold, but I would rather use the cash to buy tonewood and besides, creating the jigs is half the fun! ![]() |
Author: | nathan c [ Mon Oct 02, 2006 2:23 pm ] |
Post subject: | |
[QUOTE=MSpencer] Nathan, I share your frustration, my first attempts at doing a mold were not a good thing. I do know that it is very important for the mold to be done properly to get the results you want. I found this out when I went ahead and ordered one from John at Blues Creek. His molds are excellent and very well constructed and right on in every way. I had previously worked with a spool clamp board and what a difference. John's molds and bending patterns are very reasonable. I found them actually to be dirt cheap when I considered how much time I spent on the few slopy ones I had done myself. This is a very important tool for a number of alignment reasons so it needs to be clean and exact. Good luck on whatever direction you go Mike[/QUOTE] Thanks for the encouragement Mike. I've decided to create my own, especially since I'm using some of my own measurements. And for the $$ reason stated earlier. |
Author: | D.L.Huskey [ Mon Oct 02, 2006 2:39 pm ] |
Post subject: | |
Nathan, I also like to use the router and template to make a form. The inside of it really needs to be without ripples. Don't fret, you'll get it straightened out The first one I ever made had ripples and waves in it. I did what Brad spoke of and used a router with a pattern bit and template to straighten it out. If you don't mind me asking, where in north Alabama are you located? |
Author: | mikev [ Mon Oct 02, 2006 2:50 pm ] |
Post subject: | |
Nathan,, i too chucked my first mold. It was just too far out of whack to even try to repair. But I have since learned the right way, or at least one of them.. If you do not fully understand the template/router thing described in the previous notes, let me know.. I have some pics of the process from one I made a few months back that may help. Mike |
Author: | SimonF [ Mon Oct 02, 2006 3:12 pm ] |
Post subject: | |
Nathan, I'm the odd man out it seems. I don't see any reason why it needs to be smooth. Many people (classicals mainly) build on a solera, which usually only has points of contact around the guitar that serve as a mold. I don't see why a mold with bandsaw ridges would ever present an actual problem in the build process. A few things were mentioned that I do think are important. The first is that the sides of the mold are perpendicular which is important because your sides will follow the form. Also, the mold shouldn't have a surface that could scratch the guitar sides. Your mold should work fine if those things are in place. That said, when you want to make a more "perfect" mold - using a router is absolutely the way to go. Whatever template I am making, I start out with some very thin mdf or wood fiber type board about .125" thick. This way it is easier to cut and then sand to the exact shape. You then use that template and transfer it to some furniture grade birch or oak plyboard. I find the easiest thing is to get some double-sided carpet tape to attach the first template and the use a flush-cut router bit to duplicate the pattern. And voila. This is standard practice throughout the furniture industry. Very easy and very accurate. Best of luck, Simon |
Author: | D.L.Huskey [ Mon Oct 02, 2006 5:04 pm ] |
Post subject: | |
[QUOTE=SimonF] Nathan, I'm the odd man out it seems. I don't see any reason why it needs to be smooth. Many people (classicals mainly) build on a solera, which usually only has points of contact around the guitar that serve as a mold. I don't see why a mold with bandsaw ridges would ever present an actual problem in the build process. [/QUOTE] Agreed, Several folks use a solera, and some build free hand and don't use any type of form at all. If the sides are well shaped when bent it don't take much if any support to hold them in place. If there is a hump in the form when the sides are placed in it, then the hump can push the side out of shape, especially if spreaders are used. Band saw marks shouldn't cause any trouble as long as they don't scratch the wood as to where it can't be sanded out. I just like to have my forms as close as possible to the shape of the guitar body. |
Author: | Tom Armstrong [ Tue Oct 03, 2006 12:05 am ] |
Post subject: | |
On my first two molds I really wanted to get rid of some band saw marks (they don't bother me now though)so I spread some Bondo with a squeegee and then sealed it with shellac. Worked like a charm. Tom |
Author: | Colin S [ Tue Oct 03, 2006 12:20 am ] |
Post subject: | |
I make mine in a very similar fashion to Shawn, except that I make a plywood template and use it to cut the 8 sections on my router table, reference holes allow perfect alignment when gluing together. No sanding needed when done right, the sides are also guaranteed to be perpendicular. Colin |
Author: | Colin S [ Tue Oct 03, 2006 12:20 am ] |
Post subject: | |
Double post, whoops! Colin |
Author: | nickton [ Tue Oct 03, 2006 2:13 pm ] |
Post subject: | |
This may sound funny but on my first guitar I built a nice mold out of plywood and used some adhesive foam weather stripping tape inside to act as padding. It turned out I wanted the shape to be slightly different so I padded out certain areas. It came out fine. The mold is way too big though because I just left it rectangular on the outside, and I'm thinking of making a solera board instead. But it now sounds like the solera might not be better either. |
Author: | SimonF [ Tue Oct 03, 2006 2:44 pm ] |
Post subject: | |
Nick, Soleras work great. Check out the construction photos over at www.truenorthguitars.com to get an idea of how some of the guys are using them. It really is all about finding the method that works for you. -- Simon |
Author: | Serge Poirier [ Tue Oct 03, 2006 2:52 pm ] |
Post subject: | |
I really like Jon Kendall's way of doing this and i certainly will do this his way instead of building one next time around. Since i'd love to build many shapes, i think it is the way to go. you can see it in the "Hand powered sanding dish" thread that is probably still on this page, i'll try to post a link... Ok, here it is, check this thread, second post, just brilliant! ![]() http://www.luthiersforum.com/forum/forum_posts.asp?TID=8085& PN=2#114418 |
Author: | nickton [ Wed Oct 04, 2006 1:03 pm ] |
Post subject: | |
thanks for the advice. I have instructions from "the online apprentice" in my looseleaf notebook. I went yesterday to get dowel rod and hanger bolts. Looks like a good method to try, but I'll check out truenorth too. |
Page 1 of 1 | All times are UTC - 5 hours |
Powered by phpBB® Forum Software © phpBB Group http://www.phpbb.com/ |